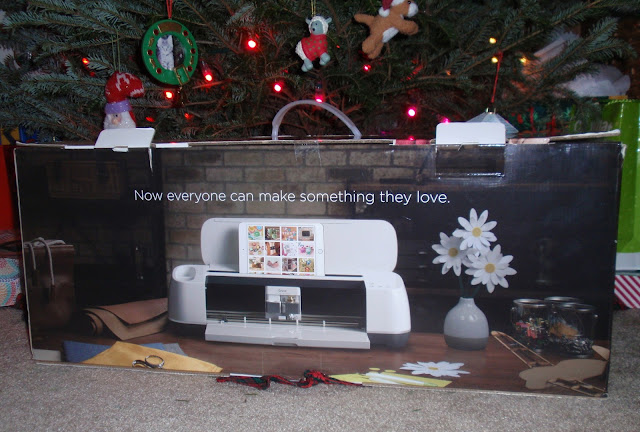
I decided to do my first Cricut check-in. I've cut out a few different things, and done a few experimental tries with the app that Cricut calls the Design Space, the place where you can either upload a pre-created file, or create something yourself. Let's start by looking at the machine itself. This is what I opened on Christmas Eve. Keep in mind that Mr. BTEG bought a special version of my machine that was exclusive to a warehouse store called Costco, and that therefore there were some extra items included, that don't normally come with a Cricut Maker purchase. Another caveat, there are several different types of Cricut machines, and other brands like Silhouette that offer machines that have some overlap with some Cricut machines. As far as I know, the Cricut Maker is currently the only line able to cut heavier items like balsa. Make sure if you want to buy a machine like this, that it is capable of doing the type of crafts that you want.


The pink and blue mats in front came with the machine. The two green mats at the back are extra long, and were an extra purchase by Mr. BTEG.
Here is what the Maker looks like when it is opened up.
So what does the Maker do? First of all, it cuts things - neatly and quickly. It can cut anything from printer paper to 2mm thick balsa wood. The Maker can also cut fabric, from light cotton to light denim or leather. It can only cut something the same size or smaller than your mats, which are either 12" x 12" or 12" x 24" if you buy a longer mat. (The Maker can also do a few more non-cutting things, which we will discuss in a bit.)
Let's talk about the mats. You might see that the pink mat is marked "Fabric Grip" and the blue mat is marked "Light Grip." There is also the Standard Grip mat, and the Strong Grip. In order to hold down the material that is being cut, each mat has a sticky surface in the graph area. Which mat you use depends on what you are cutting out. The Strong Grip is for things like balsa, while the Light Grip could be used with paper. There are also different blades used for different materials. The blade cartridge goes into side B, where the cartridge with the gold base currently sits. For my machine, I currently have a fine-point blade, for cutting out things like cardstock, a knife blade for cutting out heavier materials like balsa or chipboard, and a rotary cutter for cutting out fabrics.
How do you tell your Cricut what to print? Your Cricut must be connected to a PC. You will create an account for your machine, and get an executable file from the Internet, which you then run to open the Cricut application. By the way, who knew there were extension cords for USB cords? Mr. BTEG gave me one when I plugged the Cricut into one of my computer's USB outlets. The cord that comes with the Cricut is about three feet long, but the extension cord is helpful for me because of where my Cricut has to be set up right now relative to my PC.

Most of the pre-made Cricut files on the Cricut application are only included with the subscription package, which is $9.99 USD per month. You do receive a free month of the subscription, so you can really look around and see if it is worth it for you. I believe you also get to keep anything you upload to your personal project space that you've obtained during your free month, but double check that. If you buy anything pre-made, all you have to do is upload it to your Canvas, which is where anything you want to print with your maker will first appear. Your Canvas is graphed and can be used, for some applications, somewhat like Illustrator or Inkscape. I'll get to that more in a bit. For now, say you have something all set to go on Canvas. You tell the application that you want to make what is on your canvas, load your prepared mat into the machine, hit the Start button (looks like the Cricut C,) and you're off. Here's a very short video I took of the machine at work.
As you can see, the chipboard that I am cutting out also has to be secured to the mat by masking or painter's tape, to help hold the chipboard down. This is not always the case for thinner items.
Why is the Maker helpful, and conceivably useful for you? If you want to cut pieces out of things like chipboard or balsa, the Maker can do this faster than you could yourself, having to make multiple cuts with a knife (the knife blade in the machine goes through multiple cuts too, but faster.) If your machine is calibrated properly, the knife is sharp, and the material secure, you can create one, or multiple shapes. Here are a few pieces of chipboard cut using the Maker. I already have a few patterns purchased to cut out doll furniture pieces to assemble. The knife blade also is purported to stay sharp a reasonably long time, but I don't have direct evidence of that yet.

You can also cut out things with great detail. Here is the first project I tried with the Maker, a flower cut out of cardstock. With the Maker, it would be easy to cut out, for example, multiple banner triangles, and letters, to make a banner for your doll room, or a real-life room. The advantage with a machine is the neat cuts of curved lines and small details. If you don't like messing around cutting out little bitty pieces of paper or whatever for doll projects, this might work for you.
Now let's look at a very simple project that I designed myself, a felt Christmas tree skirt for a 1/6" scale tree. There are simple shapes that are always free to use with your Cricut software.
I put a circle onto the canvas, then made it the size I wanted by dragging a corner. Remember that I said that Canvas in some ways is like Illustrator or Inkscape? Playing around with shapes reminds me of doing the same thing in Inkscape, which has the advantage of being free. I think Inkscape and Cricut can work together, but I haven't learned how yet. I don't think I needed one after all, but at first I wanted a hole for the tree trunk in the middle of the skirt. I made a smaller circle the size I wanted, aligned it in the very center of the bigger circle with the help of the software, then cut the smaller circle out of the bigger circle. The smaller circle and the cut out hole were also saved for me, but I deleted those.
And I ended up with a perfect circle of felt, with a hole the size I wanted in the middle.

It would be easy to cut out multiple fabric shapes for doll pillows or bedding, or felt rugs. You can cut out small leaves and flower petals to make doll-sized flowers or plants. There are sewing patterns for sale for human-sized items (although not everything due to size constraints) that come with a Cricut file to cut out all your fabric pieces for you, leaving you ready to sew everything together. At one point, Simplicity offered a few Cricut patterns that would cut out pieces of fabric to make simple American Girl sized clothing. Don't get excited if you see that, as they don't exist anymore. I have read, though, that you can convert a PDF file to the kind of file that a Cricut can read, which is SVG. That means I could conceivably cut out doll clothes pattern pieces from PDF files that I own. I definitely want to try that soon. (I've since learned that images in .jpg, .gif, .png., .bmp, .svg and .dxf files can be uploaded to Cricut.)
You can cut out iron-on pieces, and it would be fun to be able to create custom iron-ons for doll clothes. Vinyl or cardstock could help create unique wall hangings for a doll-sized room, and you could even cut out a shape in something like balsa, to put stick-on vinyl onto.
There are also print-then-cut projects for the Cricut. I don't know how to create a project like this, but you print something out on a regular paper printer that has already been pre-aligned to your machine. Then you put that piece of paper with the printed image on it through the machine, and the Cricut knows to cut along the outline(s) of what is on the paper.
So there is one other thing that a Cricut can do, that I haven't even tried yet, and that is use an ink pen. You can use the software the same way, either with a pattern someone else created, or something that you made yourself. There are fonts with the Canvas software as well as shapes, although I don't know how many fonts you get for free. The pen goes in the hole in side A of the machine, like you can see above. I've read you can buy adapters to use pens other than Cricut brand, but I'm not recommending anything either way, since I have no knowledge. Also, you can do foil transfers. I received a foil transfer kit with my machine, so I'm going to check it out. I'm not entirely sure of everything that I could do with a foil transfer.
And now for the cons. The subscription fee can be seen as a con, although you can also buy individual patterns from outside sources, and from the Cricut app, so potentially, if you're not planning on using a lot of items that are pre-created, it would be cheaper just to buy patterns from outside sources as you wanted them. If there's tons of things that you want to make, the subscription might be a deal.
If you want to create your own patterns, there will be a learning curve that can be a con, but I don't think it's an insurmountable problem for most, and there is help out there.
Another con is needing the different mats and blades for the machine, if you want to cut out items using a bunch of different materials, or lots of pens if you want to create something like colorful machine written envelopes or write on fabric in different colors. You'll also need different pens for different applications, but that would be the case even if you were using a pen to write on something by hand.
Since there is a sticky coating on the mat, there will be residue left over after a project that will need to be removed. Here's a picture of the Fabric Grip mat after I cut out the green felt circle. I used painter's tape to lift up the extra green fuzzies. It can take a bit of time to get your mat cleaned off. The set of four tools you can see in picture 3, all fit into the blue-handled holder you can see in picture 4, and are used for things like what Cricut creators call "weeding," which is gently picking out unwanted pieces of the cut from the mat if you have used something like vinyl, and I think just for helping get the material off the mat depending on type. Using the example of the blue flower above, if you only wanted the outlined flower as you see it, the inside pieces of the petals would need to be removed after the cut.

Eventually, your mat will be worn out, and you'll have to get a new one. On the plus side, you do not have to get your mats from Cricut, so you can conceivably find them at much better prices. There isn't much that you do have to get from Cricut, except for the machine and blades, although you should always double check what you buy will work with your machine.
Another con is storage. You not only need a space to put the machine, with room in front and back for loading and printing, but space for the mats and tools. I also have so many new projects planned that I didn't think about trying before, like iron-ons, that I have added more materials to my crafting supplies list.
MC expressed to me that she was possibly interested in something like a laser-cutting machine. While those can read SVG files, like the Cricut machine, I do not think a specific project could use either machine interchangeably. Laser machines have the advantage of cutting thicker pieces of wood, but also seem to start in the four figures in price. Chipboard or balsa can always be layered if you want to make doll furniture using thicker pieces of material than 2mm thick, and using a machine would help insure that the pieces were the same size before they were glued together.
Again, I will list the caveat above; check that a machine can do what you want before you buy it. There is lots of information on the Internet about these types of machines, both from the manufacturers and independent crafters. Also, check that a file was made to be used with the type of machine that you own, before you buy it.
So do I think you *need* one of these? No, not really. Anything the Maker can cut, can also be cut out by hand. Even tiny details in cardstock can be cut out if you have a steady hand and a sharp enough cutting tool. However, I don't have a steady hand, craft with several different types of materials, and am awful at cutting out things like chipboard by hand. For me and the crafts that I want to make, the Maker was worth the price. (The fact that I got it as a Christmas gift didn't hurt, although I wouldn't have asked for it if I didn't think I'd use it much.) I would be glad to answer any questions that you have, although as I have said, there is *so* much information out there, maybe even in your native language. Anyone working on any doll projects?
(This post was edited on February 4, 2022, to reflect new information I've learned.)