
Showing posts with label roombox. Show all posts
Showing posts with label roombox. Show all posts
Wednesday, October 2, 2019
October Instagram Challenge Day 2: Decoration

Sunday, September 8, 2019
Grocery Giveaway Submission
Xanadu is giving away some doll-sized grocery items (in various scales) at her blog. She asked that you post an interesting pic of your dolls on your blog, and link back to her giveaway post. For some reason, I read it as her wanting pictures of tiny dolls, so I killed two birds with one stone. My Cu-Poche girls are enjoying a day at the beach relaxing, with a LORI patio swing that I've been meaning to share. It came with the lemonade pitcher, two glasses of lemonade, the tray, and the "grass" rug for the swing to sit on. Unfortunately, Little Red's big hair made it impossible for her to sit on the swing, so she's lounging on the grass with her lemonade.
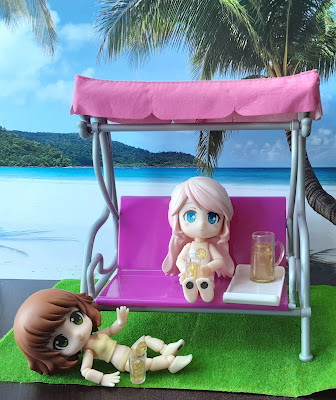 This is really made for the mini LORI dolls, and similar dolls like the mini American Girl dolls, but I thought the Cu-Poche girls might look cuter with it. I think they do, except poor Little Red can't sit on it!
I have a huge backlog of new purchases to blog about, so stay tuned! I just finished up a nice new roombox for the photography. It doesn't take up too much space on my worktable, but it's large enough that I can feature a few dolls or items in it at a time. I finished covering the floor last night; I took this photo the day before.


I have a huge backlog of new purchases to blog about, so stay tuned! I just finished up a nice new roombox for the photography. It doesn't take up too much space on my worktable, but it's large enough that I can feature a few dolls or items in it at a time. I finished covering the floor last night; I took this photo the day before.

Monday, April 2, 2018
Room Box Design
First off, I have to credit Jatman of JatmanStories, and Mr. BTEG, for some of the ideas that I used to make my room box with swap-able windows/floors. Jatman offers a tutorial about how she makes her roomboxes here.
It all started because I found moving boxes at Lowe's home improvement store, that are made of thicker cardboard than the standard moving boxes. I figured that would be especially ideal for making doll living spaces, so I bought one and brought it home, to do an initial try.
At first, I was thinking about just placing wall and flooring papers in the box permanently. It was Mr. BTEG who suggested the idea of being able to switch floors in and out. How to do it securely, was my question. At first, I thought of using pins, or small bulldog clips. However, Mr. BTEG came up with what I think is a far better solution: Velcro.
So here is the box, with sticky-back Velcro on the cardboard walls. The floor is a piece of foam core with scrapbook paper taped on it with double-sided tape. I felt this was the best way to secure the paper, as glues do not work very well on foam core. This floor admittedly is very patchy. I should have had four pieces of paper for this to work the best, but I only bought three. When I went back to Michael's, they were either out, or they don't carry this paper anymore.

 The foam core piece for the floor is cut so it fits exactly into the box. The wall pieces will then stand directly on top of the floor piece.
 So on the walls of the permanent cardboard box structure are pieces of sticky-back Velcro loops. On the papered walls of foam core, that I can swap in and out, there are corresponding pieces of sticky-back Velcro hooks. I got the idea from Jatman of using white Contact Paper to cover the raw edges of the foam core.
 One wall is stuck to the cardboard box, flush against both the floor and the side of the cardboard box. Then, the other wall is set in, pushed tightly against the other wall, so there is not very much of a visible seam.

 The green rug is a sheet of scrapbook paper that has a nice paisley design and also the illusion of texture, which gives it the appearance of a rug. There was a sale on scrapbook paper when I bought this at Michael's, so I bought the same design in at least two other colors. The rug is especially useful here to help hide the patchiness of this floor.

 And that's my roombox! It's very simple, but I think the effect it produces is nice. I can cover all three side of the cardboard box with scrapbook paper covered walls, or use the same idea with a larger box, or have a larger box with maybe only two sides for different lighting and photography options. The nice thing about the cardboard box "foundation" is that it is relatively sturdy. I will also be creating walls with cut-out windows, and putting some kind of paper behind the right side of the foam core wall, to create an "outdoor" view.
I hope all of you who celebrated Easter yesterday had a very nice one. Life has been a little chaotic here at Casa BTEG, so I wasn't able to get an Easter photoshoot together. Hopefully, everything that's been making life crazy here will be resolved very soon!
It all started because I found moving boxes at Lowe's home improvement store, that are made of thicker cardboard than the standard moving boxes. I figured that would be especially ideal for making doll living spaces, so I bought one and brought it home, to do an initial try.
At first, I was thinking about just placing wall and flooring papers in the box permanently. It was Mr. BTEG who suggested the idea of being able to switch floors in and out. How to do it securely, was my question. At first, I thought of using pins, or small bulldog clips. However, Mr. BTEG came up with what I think is a far better solution: Velcro.
So here is the box, with sticky-back Velcro on the cardboard walls. The floor is a piece of foam core with scrapbook paper taped on it with double-sided tape. I felt this was the best way to secure the paper, as glues do not work very well on foam core. This floor admittedly is very patchy. I should have had four pieces of paper for this to work the best, but I only bought three. When I went back to Michael's, they were either out, or they don't carry this paper anymore.


I hope all of you who celebrated Easter yesterday had a very nice one. Life has been a little chaotic here at Casa BTEG, so I wasn't able to get an Easter photoshoot together. Hopefully, everything that's been making life crazy here will be resolved very soon!
Saturday, March 17, 2018
Happy St. Patrick's Day!
Been really busy today, partially putting this room together. Barbie and the gang are hanging out a friend's waiting for the limousine to pick them up before they head out to enjoy the evening at their favorite Irish restaurant/bar.
 St. Patrick's Day is a big deal around here. I actually did see a stretch SUV limousine parked outside one of the local Irish restaurants at about three, and the restaurant had to be packed to the rafters, considering the parking lot was overflowing. I also saw at least three limo-buses driving around, one with people all dressed in green clothes.
The shamrock lights and shamrock paper I got during my latest trip to the craft store. I'll be blogging about that; I picked up a lot of really nice things on that trip. I'll also be writing a post about my new room box set-up, which you can see above. Floors and walls can be switched in and out, and now I just have to create a bunch of nice window and floor sets to use.
Erin go bragh!

The shamrock lights and shamrock paper I got during my latest trip to the craft store. I'll be blogging about that; I picked up a lot of really nice things on that trip. I'll also be writing a post about my new room box set-up, which you can see above. Floors and walls can be switched in and out, and now I just have to create a bunch of nice window and floor sets to use.
Erin go bragh!
Thursday, March 20, 2014
House Shaped Room Box
If you don't read The AG Minis of Snickerdoodle Street blog, or you don't shop at Target, you might have missed this little storage box that is shaped like a little house:

As you can see, it's not really for the bigger doll; Madeline measures only 7" high. The measurements of the box are 11" to the top of the roof, 12" wide and 8" deep. But it will work for smaller dolls. Here is another picture, this time with the 6 1/2" AG mini Samantha.

You could set up a small room setting, or even just have dolls standing on display. This box can hang on the wall, too, so if you don't have flat space, you could hang it. It is on clearance at Target, so if you want one, I'd say better sooner than later. The inside of the house is colored either blue or pink. It will be in the storage section. This house came out with a great many other storage bins, boxes and baskets, all in bright blues, greens, reds and pinks. At my Target, this house was on an outside aisle, but some of the other items from this collection were on endcaps, so look around if you don't see it right away. Let me know if you pick one up!
As you can see, it's not really for the bigger doll; Madeline measures only 7" high. The measurements of the box are 11" to the top of the roof, 12" wide and 8" deep. But it will work for smaller dolls. Here is another picture, this time with the 6 1/2" AG mini Samantha.
You could set up a small room setting, or even just have dolls standing on display. This box can hang on the wall, too, so if you don't have flat space, you could hang it. It is on clearance at Target, so if you want one, I'd say better sooner than later. The inside of the house is colored either blue or pink. It will be in the storage section. This house came out with a great many other storage bins, boxes and baskets, all in bright blues, greens, reds and pinks. At my Target, this house was on an outside aisle, but some of the other items from this collection were on endcaps, so look around if you don't see it right away. Let me know if you pick one up!
Subscribe to:
Posts (Atom)